
PRACTICAL GUIDE 01
From spreadsheet to your first classroom draw
Set up one small, reliable roster before bringing the wheel into a live lesson. This walkthrough uses eight fictional names and two fixed groups.
01 Start with the smallest useful spreadsheet
Create a sheet with a Name column. Add Group only if you already teach in fixed groups. You do not need student numbers: Calling You assigns them. Leave scores, attendance totals, email addresses, and other unrelated information out of the import. A minimal roster is easier to check and exposes less personal information on a shared screen.
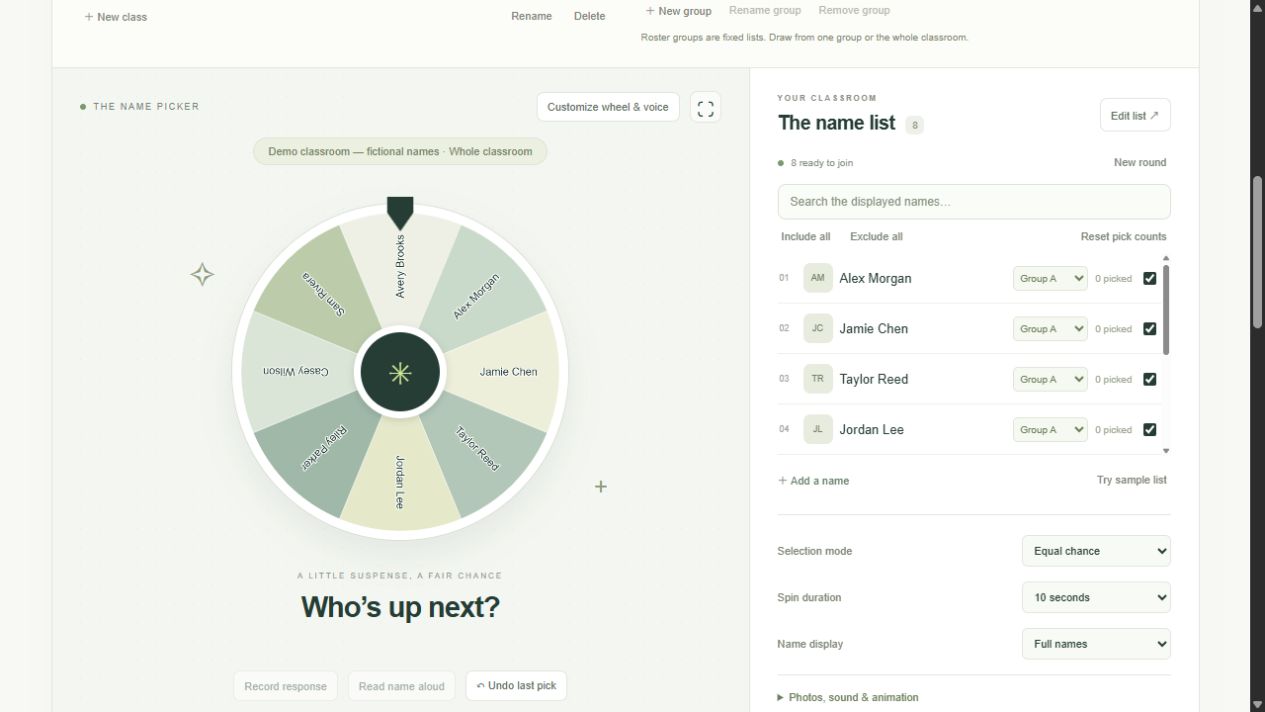
Our sample puts Alex Morgan, Jamie Chen, Taylor Reed, and Jordan Lee in Group A, and Riley Parker, Casey Wilson, Sam Rivera, and Avery Brooks in Group B. These are fictional examples, not student records. Download the simple CSV below and replace the names in your own copy. If a name contains a comma, keep it in a properly quoted spreadsheet cell rather than splitting it into two students.
02 Create a classroom before importing
Open the workspace and choose New class. Give it a recognizable title, such as Monday science. Classroom titles are visible even when student names are masked, so avoid private details in the title. A separate classroom keeps its roster, fixed groups, recent records, pick counts, and no-repeat round together.
Choose Edit list, then Spreadsheet: Name, Group. Paste the header and rows copied from your spreadsheet, or choose a CSV file. Read the preview before saving. The change review below the input lists new, existing, and removed students, previews the first six rows, and shows the total after saving. Existing students keep their numbers; new students receive new numbers. Inspect a removed name before replacing an established roster. A spreadsheet table replaces the selected classroom roster; it is not an append-only attendance log. Download a JSON backup before replacing an established roster. A names-only edit can instead target one selected scope.
Use the fictional example
Start with eight names and two fixed groups. Replace these examples in your own copy.
Download roster CSV Photo filename CSV03 Check the import with a simple reconciliation
After saving, compare the visible roster total with your sheet. Our example should show eight people in the whole classroom, four in Group A, and four in Group B. Use Pick from to inspect each group. Search for a distinctive name to confirm spelling and group membership. Exact duplicate names may be merged or rejected depending on the import format; use distinct, minimal identifiers if two students share a name.
An empty group column creates an ungrouped person. It does not exclude them from a whole-class draw. You can move a person with the group menu beside their name. Use the avatar button to edit their name while keeping their existing identifier and cumulative records. Editing an established person is safer than deleting and recreating them just to fix spelling.
04 Prepare the screen and run one draw
Uncheck anyone who should not be selected today. Choose Full names, Initials, or Student numbers before projecting the page. Masking changes the display; it does not encrypt the saved roster. Photos are hidden by default when you switch to a masked display, but can be explicitly enabled again. Check the screen yourself before sharing it.
Start with Equal chance and a ten-second spin. The center countdown shows how much time remains. The animation illustrates the selection; color, images, sound, and duration do not increase anyone’s probability. When a name appears, the response button and pending activity record become orange. Open Record response, choose a status, and save to complete that record. For a simple roll call, leave question counts at zero.
05 Finish with a recoverable workspace
Open Edit list and choose Back up all classrooms after setup. The JSON file contains the whole workspace, including full names, images, settings, and records. Store it somewhere appropriate for your organization. A CSV roster is useful for adding names; it cannot restore all classroom state.
If the preview rejects a file, check that the first row uses supported headers and that your spreadsheet was saved as CSV rather than XLSX. If the roster is unexpectedly empty, check the selected classroom, group scope, search field, and inclusion checkboxes before importing again. The easiest recovery is often to clear an accidental filter, not to overwrite the roster a second time.